Help

Kodi

Choose your device to see players and follow the setup step by step.

Step 2 of 3

Choose a player

Android · 7 players

Step 3 of 3

Kodi

Installation

Kodi is a free, open-source media center available for Windows, Android, Android TV, macOS, Linux, and Raspberry Pi.
It supports M3U playlists, electronic program guides (EPG), and catch-up TV.
Kodi is best suited for advanced users looking for a highly customizable media center with extensive configuration options.


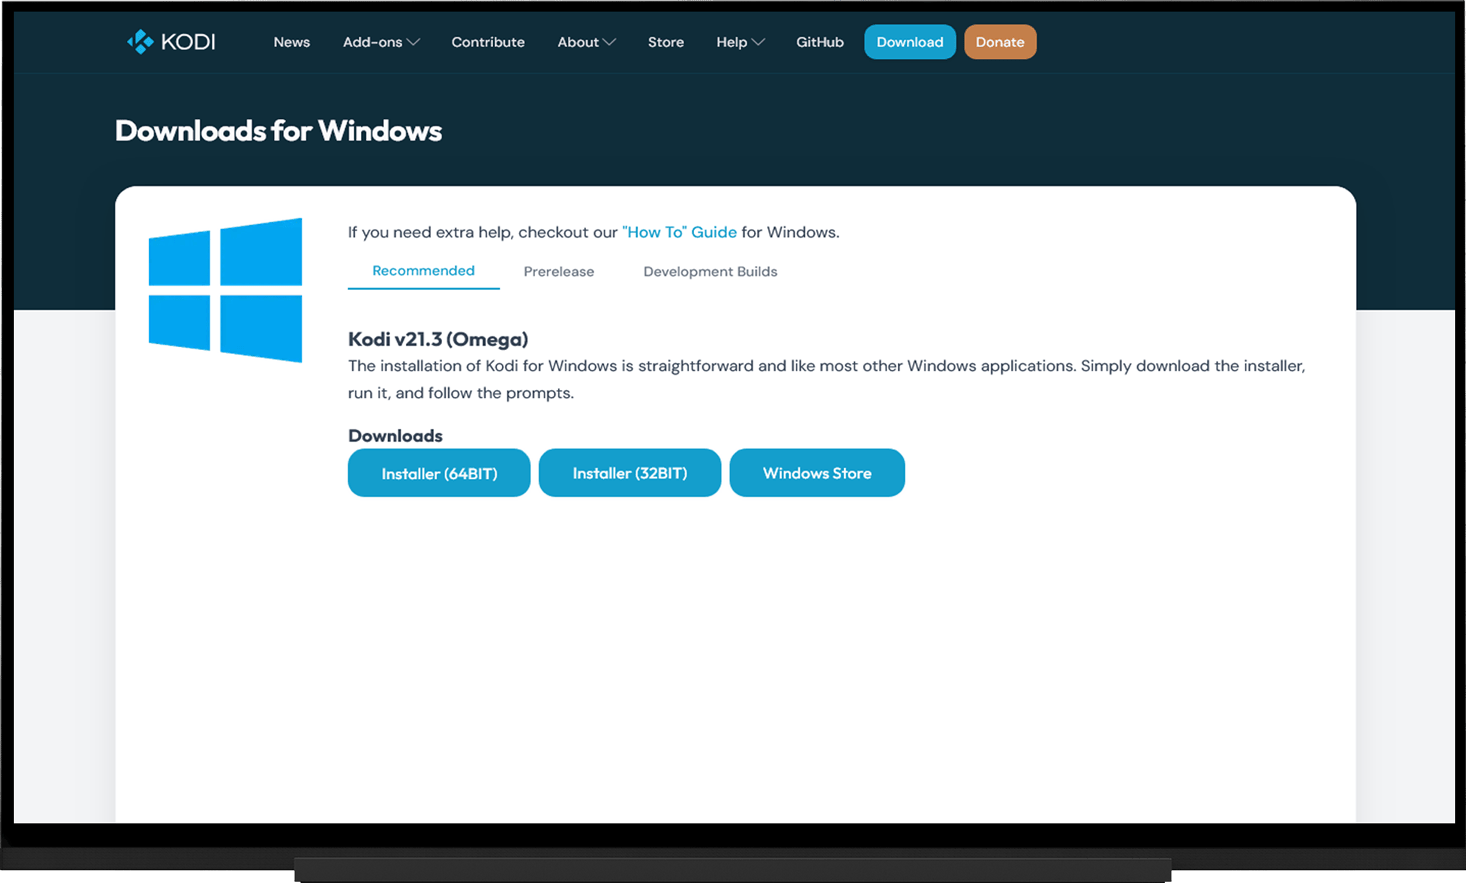
Windows

  • Download the installer from the official Kodi website or install the application from the Microsoft Store​
  • Run the installer.
  • Follow the installation wizard.
  • Once the installation is complete, launch Kodi.
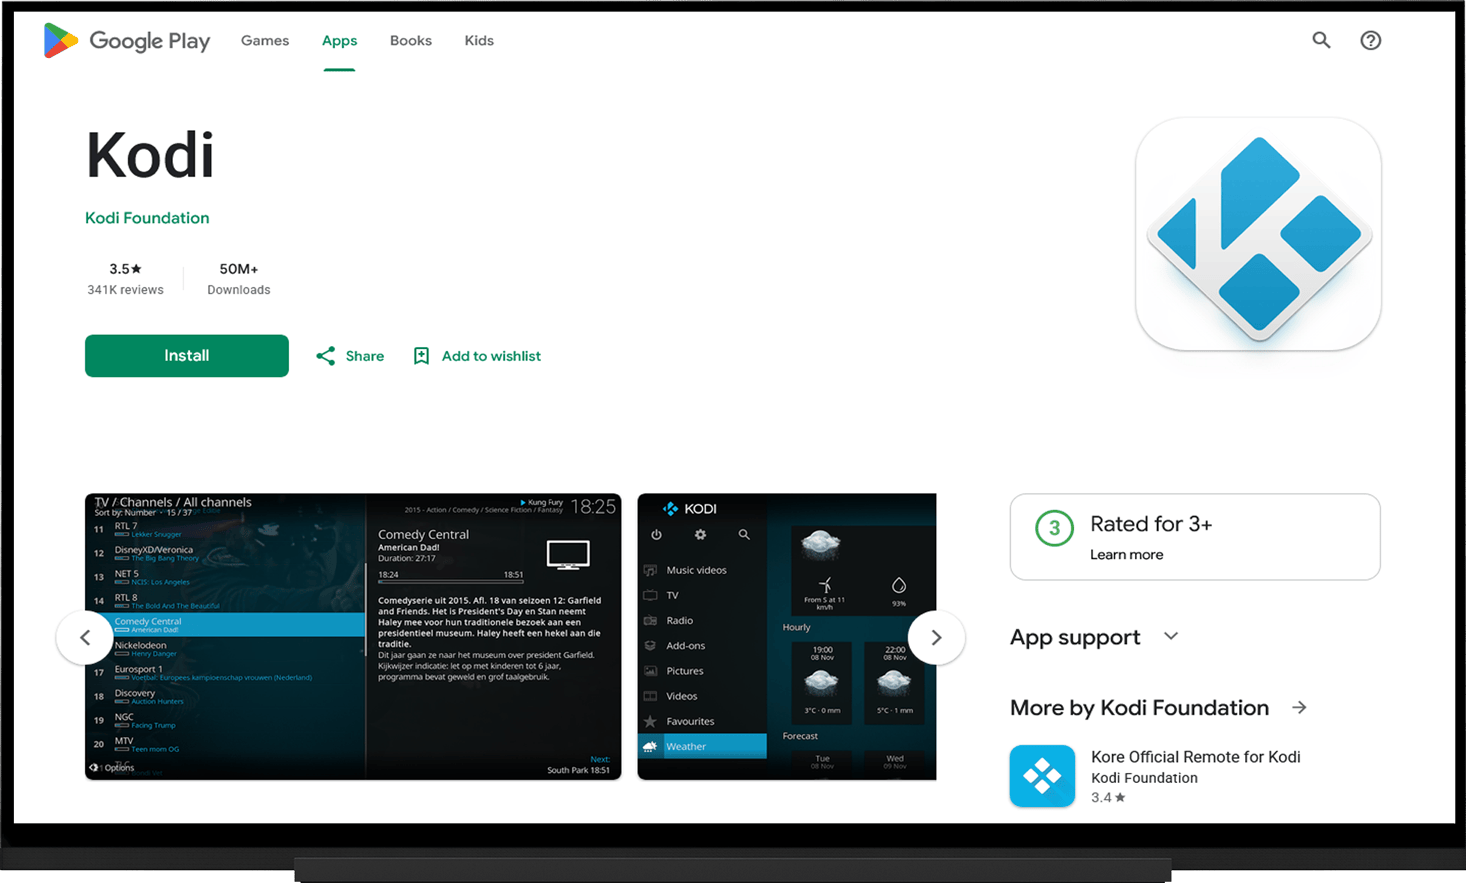
Android / Android TV

Install the application from one of the following app stores:


macOS 10.14 or later

  • Download the .dmg file from the official Kodi website​
  • Open the downloaded file and drag the Kodi icon into the Applications folder shown in the same window.
  • Wait for the files to finish copying.
  • Open the Applications folder on your Mac.
  • Launch Kodi. If macOS displays a security warning, click "Open".

Installing IPTV Simple Client

Important: The Kodi developers strongly recommend disabling all installed PVR add-ons before installing IPTV Simple Client.

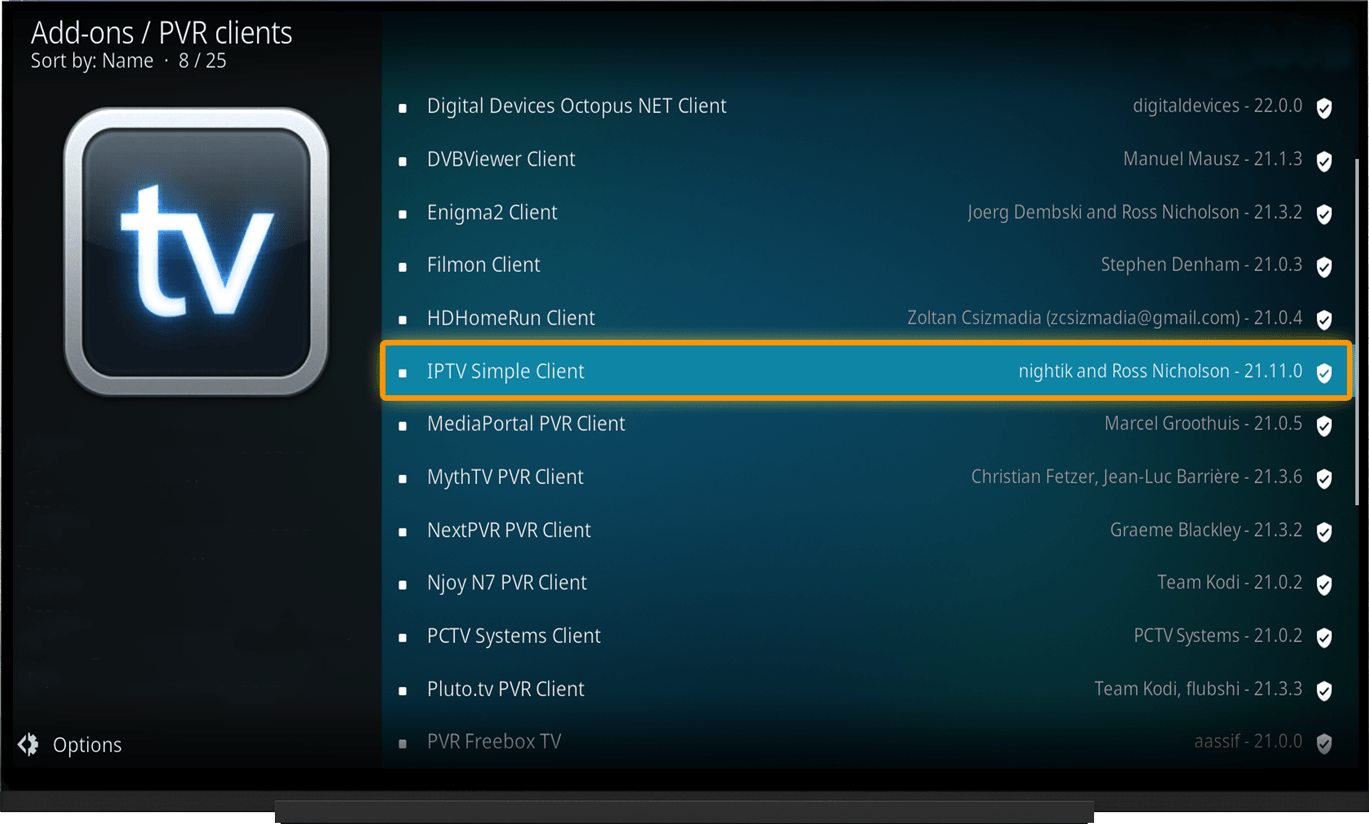
Go to:

  • Settings.
  • Add-ons.
  • Install from Repository.
  • PVR Clients.
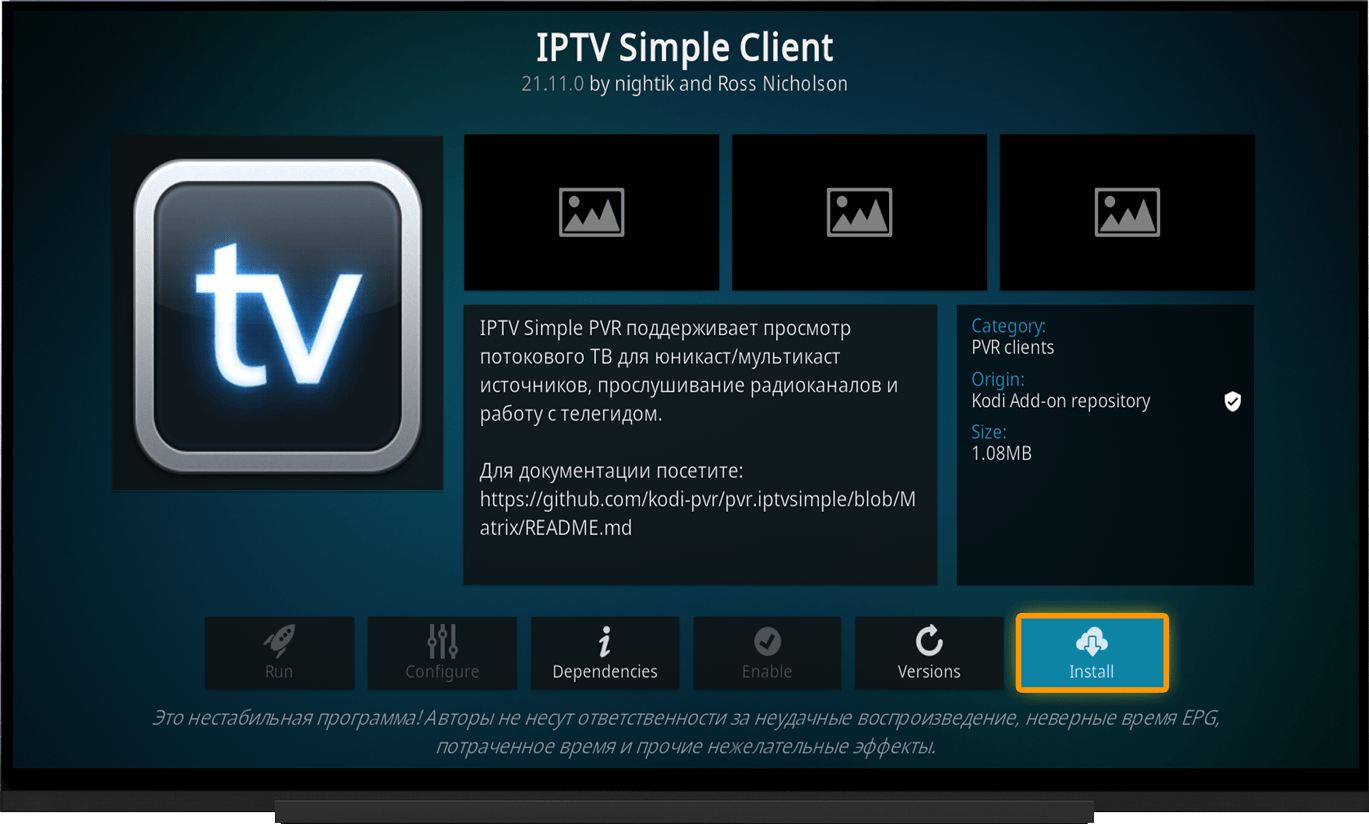
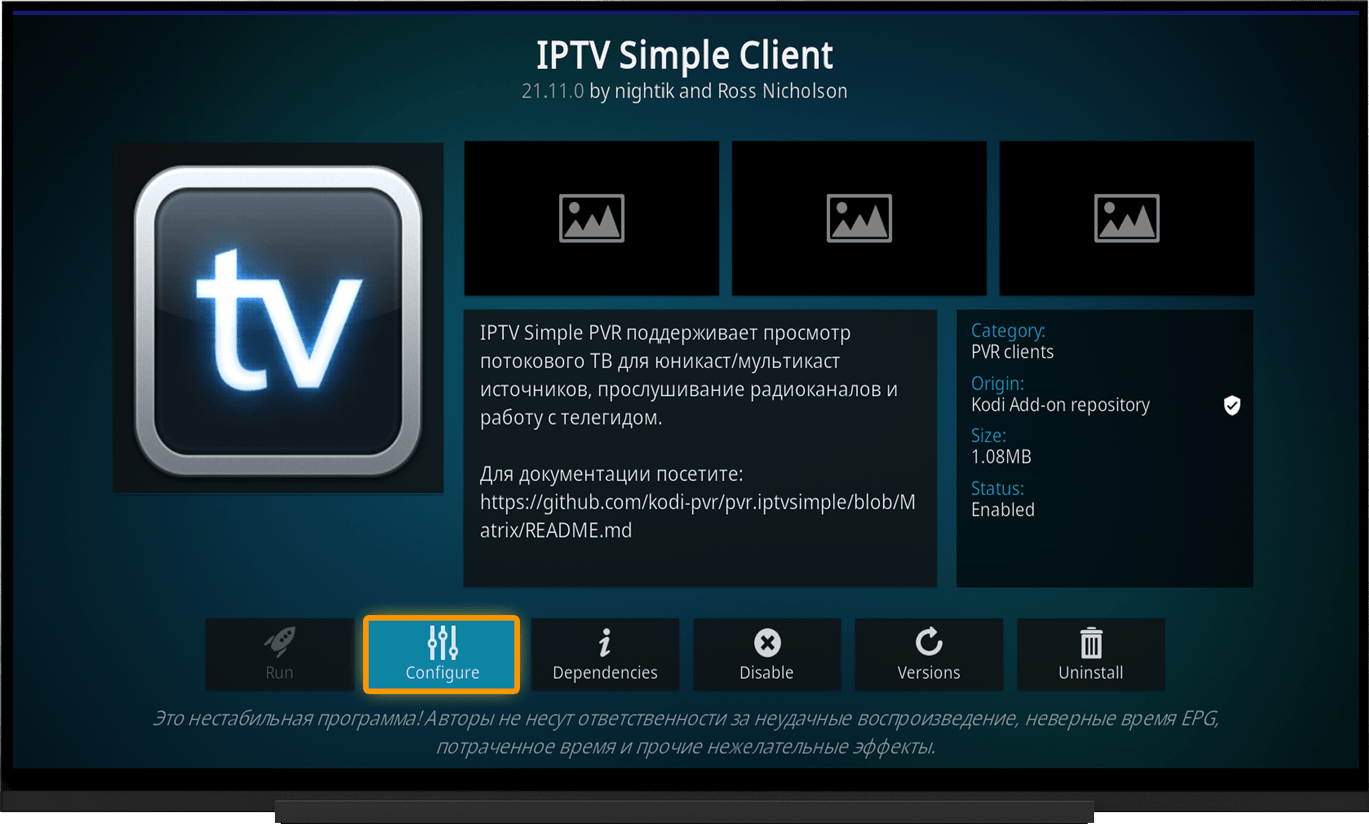
  • IPTV Simple Client.
  • Install the add-on.
  • After the installation is complete, select "Configure".
Adding a Playlist

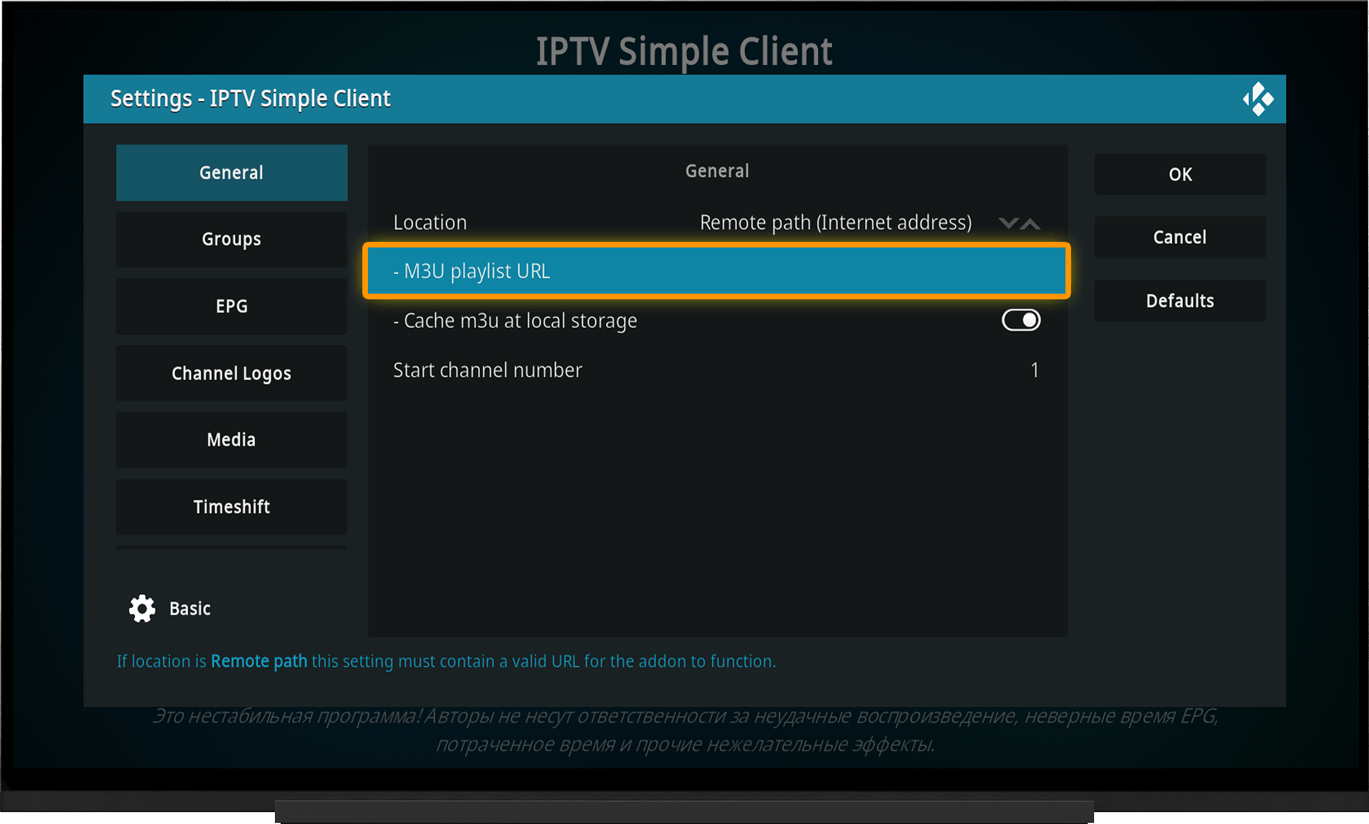
Method 1: Playlist URL.

In the "General" section:

  • Set "Location" to "Remote Path (Internet Address)".
  • Paste the direct M3U playlist URL into the "M3U Playlist URL" field.
  • Click OK.

Method 2: Local Playlist File.

In the "General" section:

  • Set "Location" to "Local Path".
  • Select the location of the M3U playlist file saved on your device.
  • Click OK.

Note:

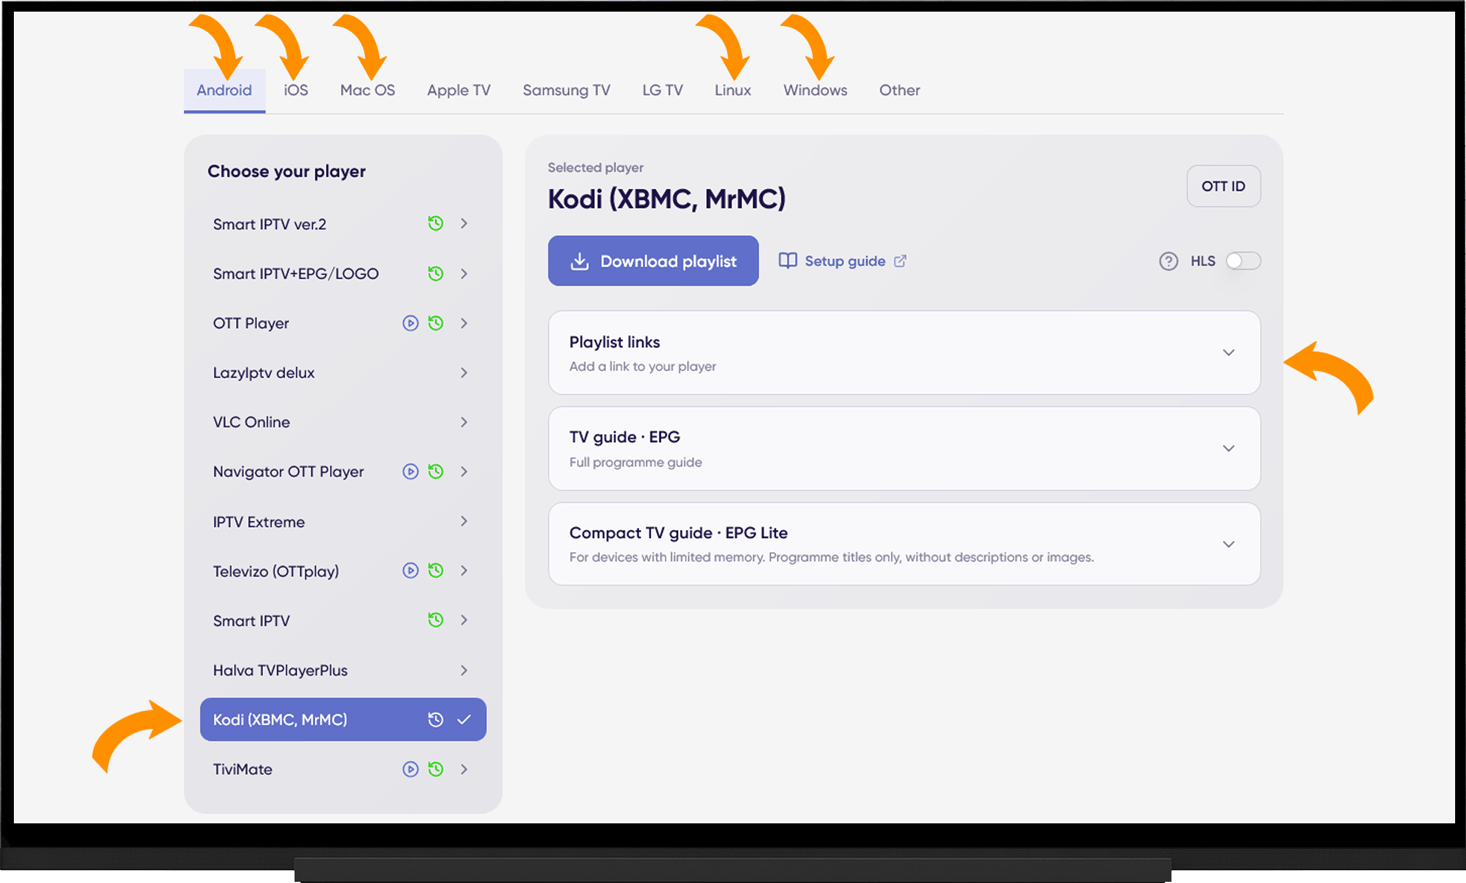
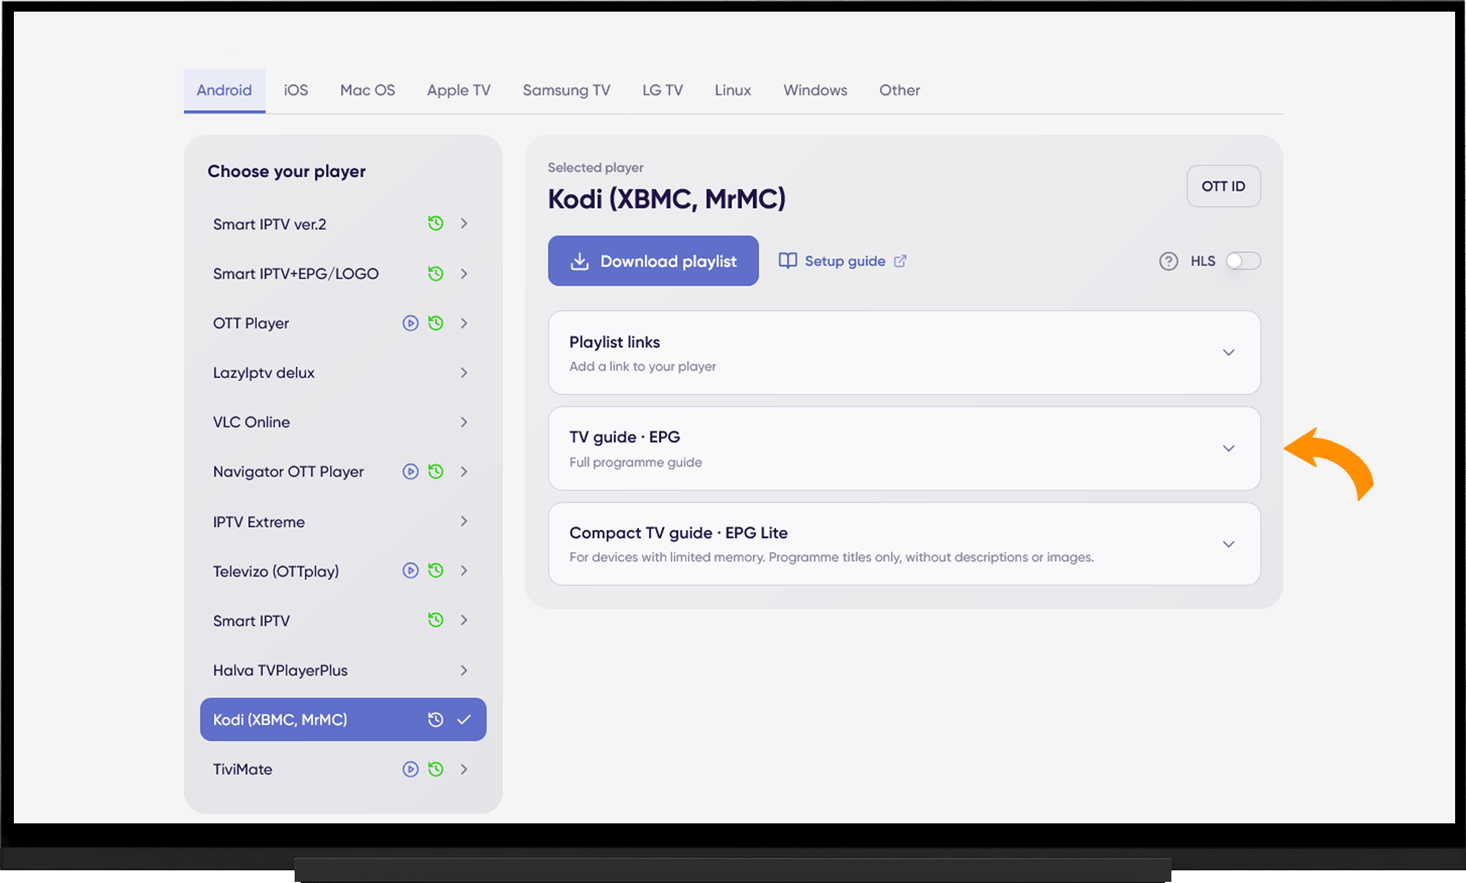
To get the playlist or file, go to the My Devices section and click the corresponding button to the right of the device name:

  • Select your device type.
  • Choose "Kodi (XBMC, MrMC)".
  • Under "Playlist Links", either copy the playlist link or click "Download Playlist", depending on your preferred playlist format.
Archive

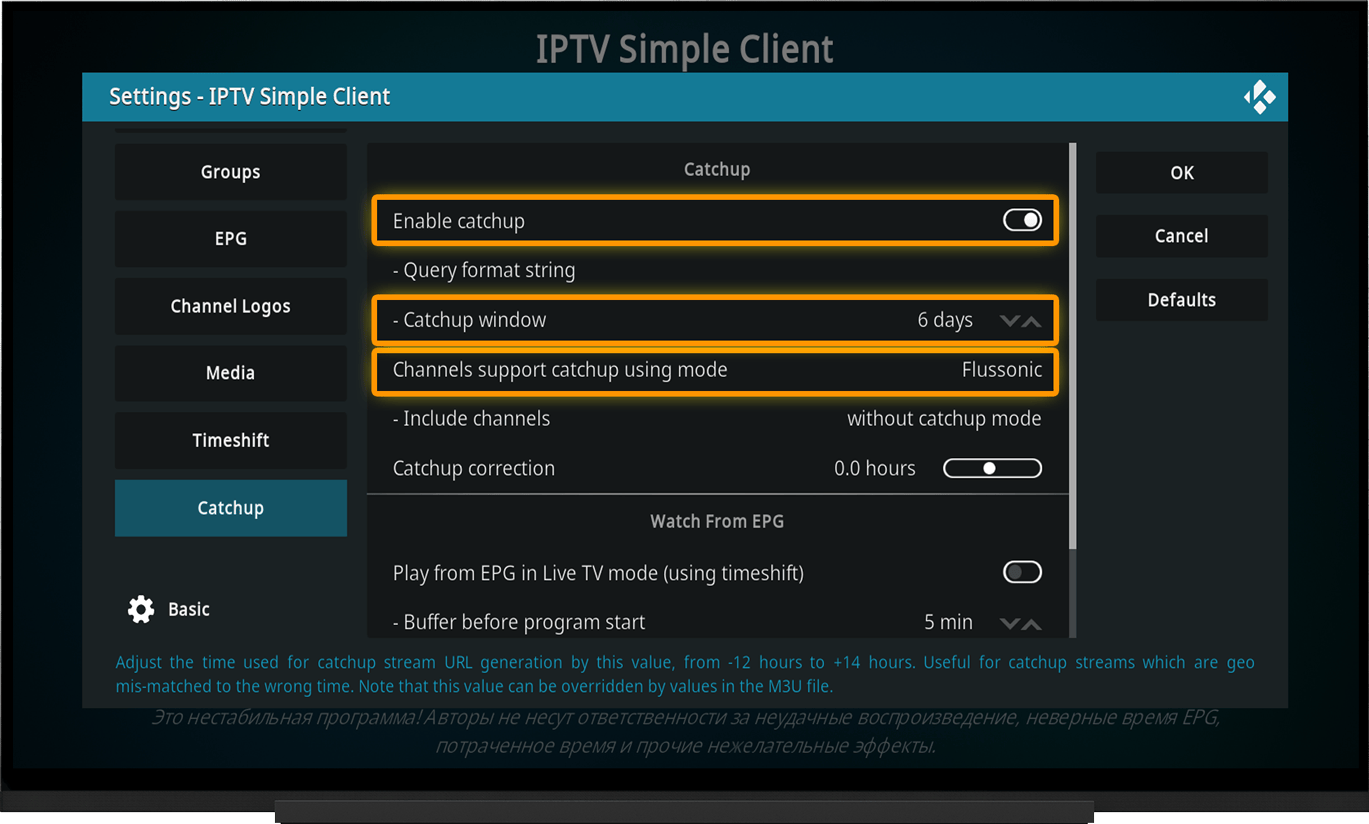
In the IPTV Simple Client settings, open the "Catch-up" section (located at the bottom of the settings list):

  • Enable Catchup.
  • Set the "Catchup window" to 6 days.
  • Set the "Catchup support using mode" to Flussonic.
  • Click OK.

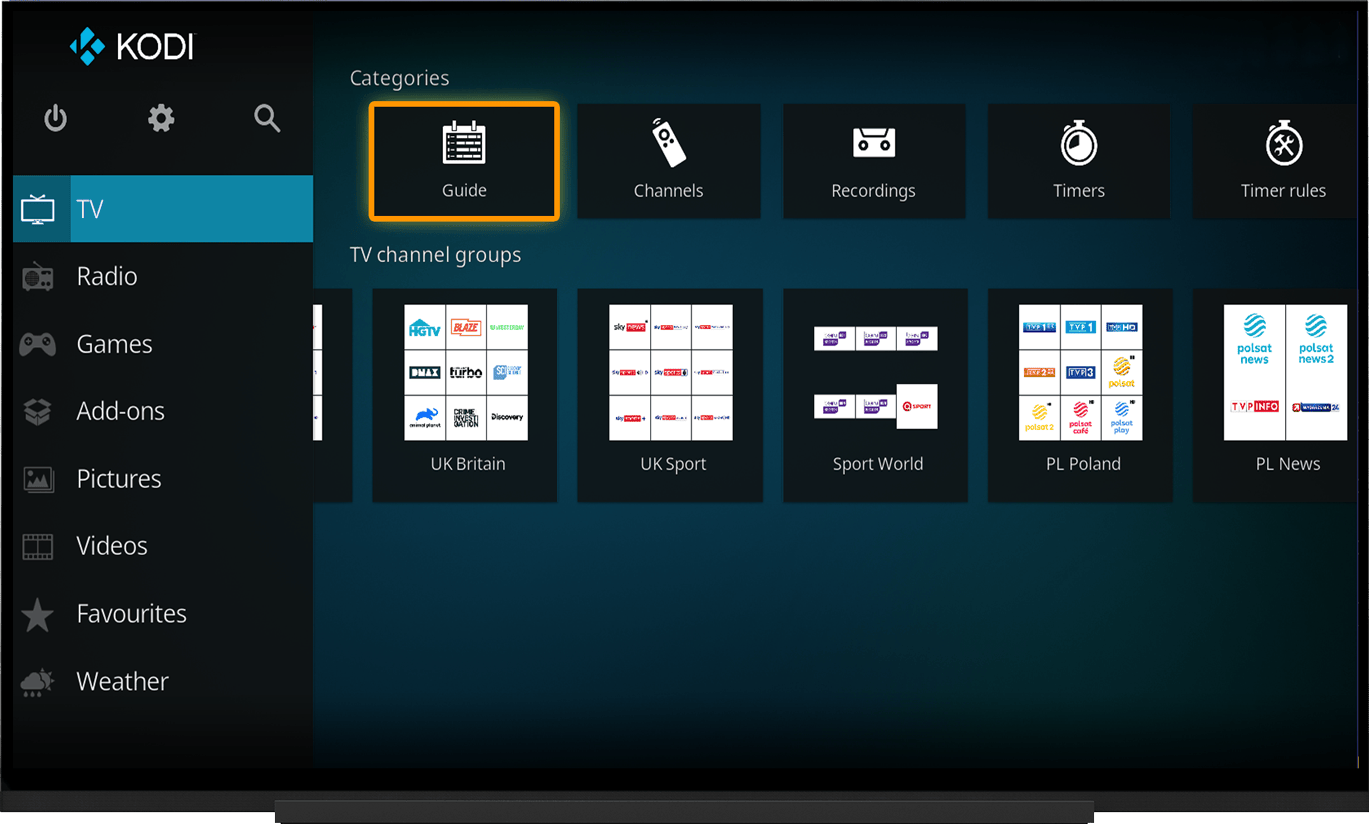
To access catchup recordings, go to the TV section, select "Guide", then choose the desired channel and recording.
EPG

When using the correct Kodi playlist URL, there is no need to configure additional EPG settings.

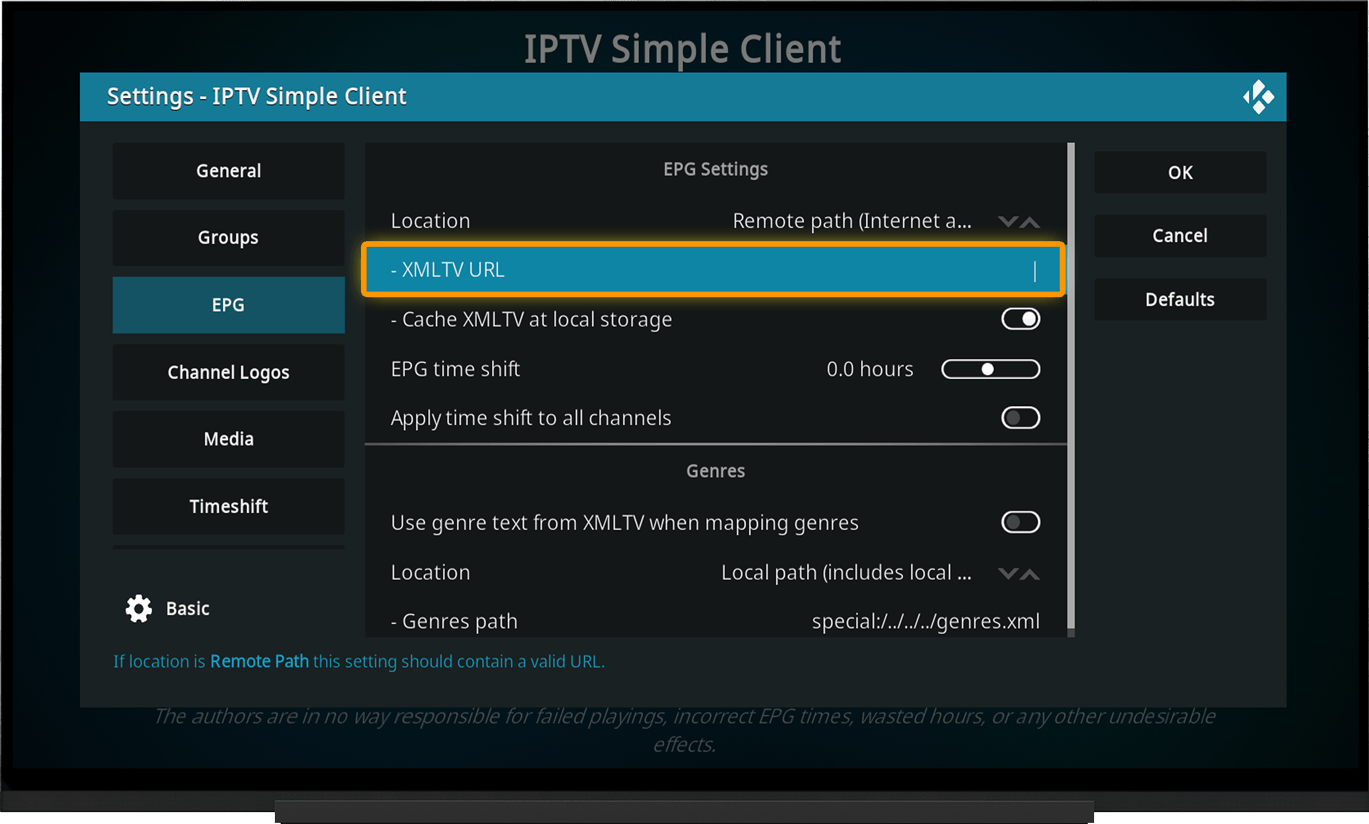
If you used a different playlist type for setup, you may need to add an EPG source URL manually. To do this, open the EPG section in the IPTV Simple Client settings:

  • Set "Location" to "Remote Path (Internet Address)"
  • In the "XMLTV URL" field, enter the EPG source URL.
  • Click OK.

Note:

To get the EPG URL, go to the My Devices section and click the corresponding button to the right of the device name.

On the playlist download page, expand the "TV guide · EPG" section.
Frequently asked questions

1. Channels are not loading (empty channel list after setup)

Reason:

  • The playlist URL or file path is incorrect.
  • The selected location type does not match the playlist source.

Solution:

In the PVR IPTV Simple Client settings → "General".

  • Check the "Location" setting:
    For a direct playlist URL, select "Remote Path (Internet Address)".
    For a playlist file stored on a USB drive or device memory, select "Local Path".
  • Check the playlist URL (case sensitivity, no extra spaces at the end).

 2. Channels are loaded, but the TV guide (EPG) is empty

Reason:

  • XMLTV is not configured.
  • The EPG source URL is incorrect.

Solution:

In the PVR IPTV Simple Client settings → "EPG":

  • Set "Location" to "Remote Path (Internet Address)" and enter a valid XMLTV source URL in .xml or .xml.gz format.
  • Go to Kodi Settings → PVR & Live TV → "General" and select "Clear data". This will force the TV guide to reload.
  • Use our dedicated Kodi playlist, which already includes the EPG source and all required attributes.

3. EPG time is ahead or behind the actual schedule

Reason:

  • The time zone difference between your region and the EPG source server.

Solution:

In the PVR IPTV Simple Client settings → "EPG":

  • Adjust the "EPG Time Shift" value.
  • Set the required offset (for example, +3 or -2) to match your local time.

4. Streams stop or freeze every few seconds/minutes

Reason:

  • Kodi cache/buffering issues.
  • Unstable connection to the router.
  • Unstable connection to the selected server.

Solution:

In the PVR IPTV Simple Client settings → "General":

  • Enable "Cache M3U at local storage".
  • Connect the device to the router using an Ethernet cable or use a 5 GHz Wi-Fi network if issues occur on 2.4 GHz.
  • Run the server selection test, switch to the optimal server, and restart Kodi after 10 minutes.

5. Kodi freezes during "Importing TV guide data"

Reason:

  • A large XMLTV file overloads the device's CPU or memory.

Solution:

In the PVR IPTV Simple Client settings → "EPG":

  • Enable "Cache XMLTV at local storage".
  • Use the lightweight "Lite" EPG source without detailed programme descriptions.
    To get the EPG source URL:
    Go to the My Devices section and click "Download" next to the device name. On the playlist download page, expand the "Lite EPG Sources" section.
  • In Kodi Settings → PVR & Live TV → "Guide", increase the EPG update interval (for example, to 12 or 24 hours) to prevent Kodi from rebuilding the database at every startup.

6. "Could not find PVR add-ons" error during installation

Reason:

  • Some unofficial or "clean" Kodi builds (especially on Linux/Ubuntu) do not include PVR clients by default.

Solution:

For Android / Windows:

  • Make sure you are searching for the add-on in the official Kodi repository:
    Add-ons → Install from Repository → PVR Clients.

For Linux (Ubuntu/Debian):

  • Install the add-on through the terminal using the command:

​sudo apt install kodi-pvr-iptvsimple
​

Is everything working?
No, I need help

Questions by topic

Frequently Asked Questions

How do I start using the service?

After completing registration and signing in to your account, you will need to go through five simple setup steps.

In the My Devices section, click "Add Device":

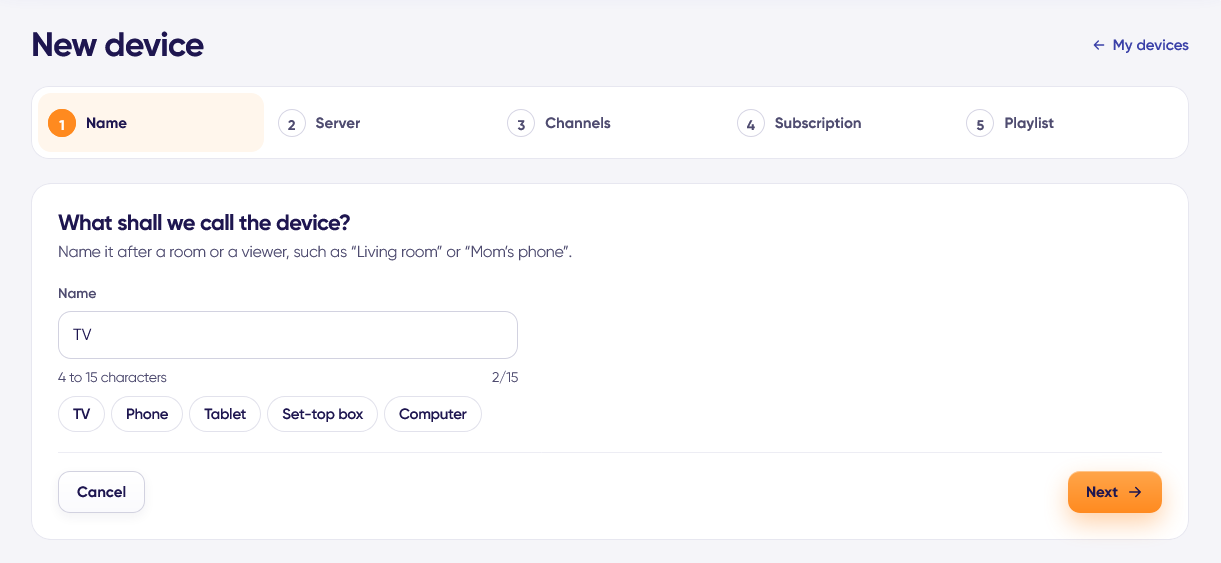
1. Name — give the device any name (for example, "My TV") and click "Next".

step1.png


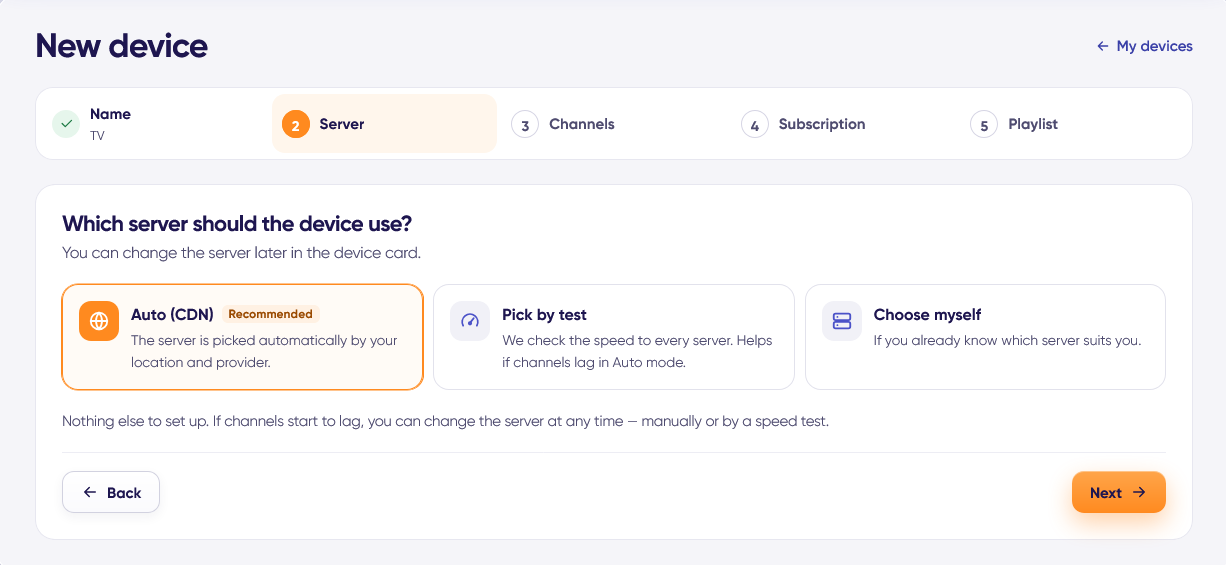
2. Server - choose one of the three available options:

  • Auto - the server will be selected based on other users' results and your location.
  • Selection by Test - click "Select" and wait for the test to complete.
  • Manually - choose a server yourself from the list.
step2.png


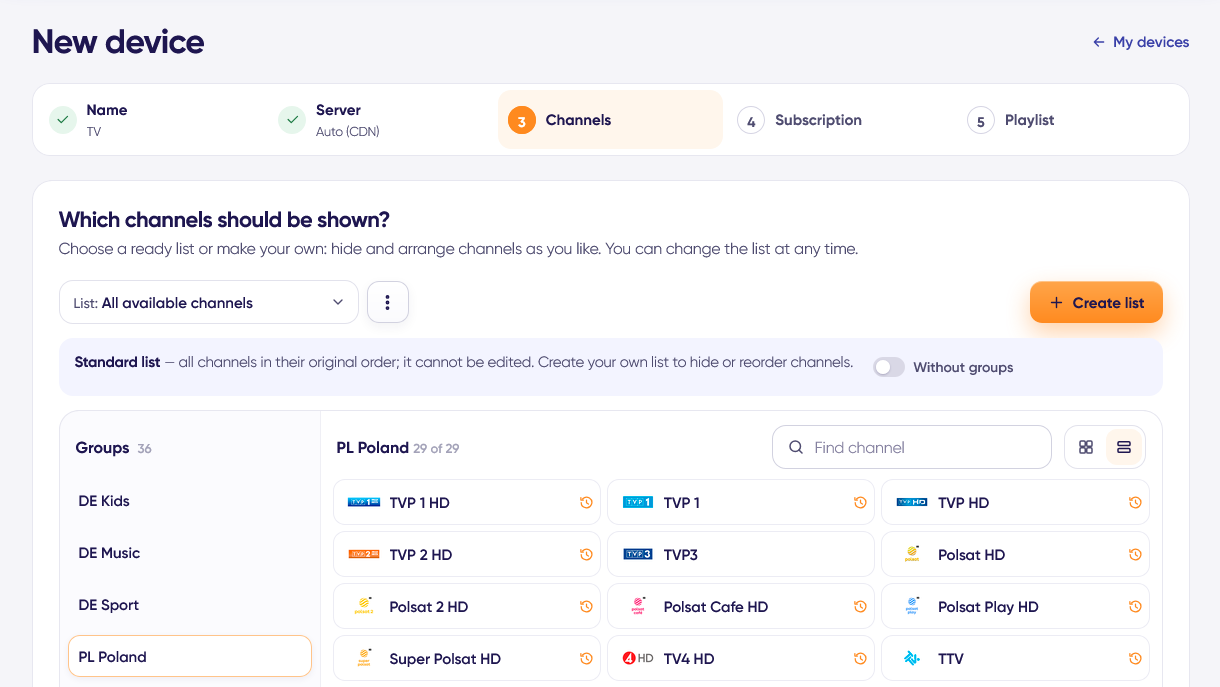
3. Channel list - here you can select and assign a default channel list to the device or create and edit a personalized playlist in the Channel List Editor.

Please note that you can create your own channel list later at any time.

step3.png

​

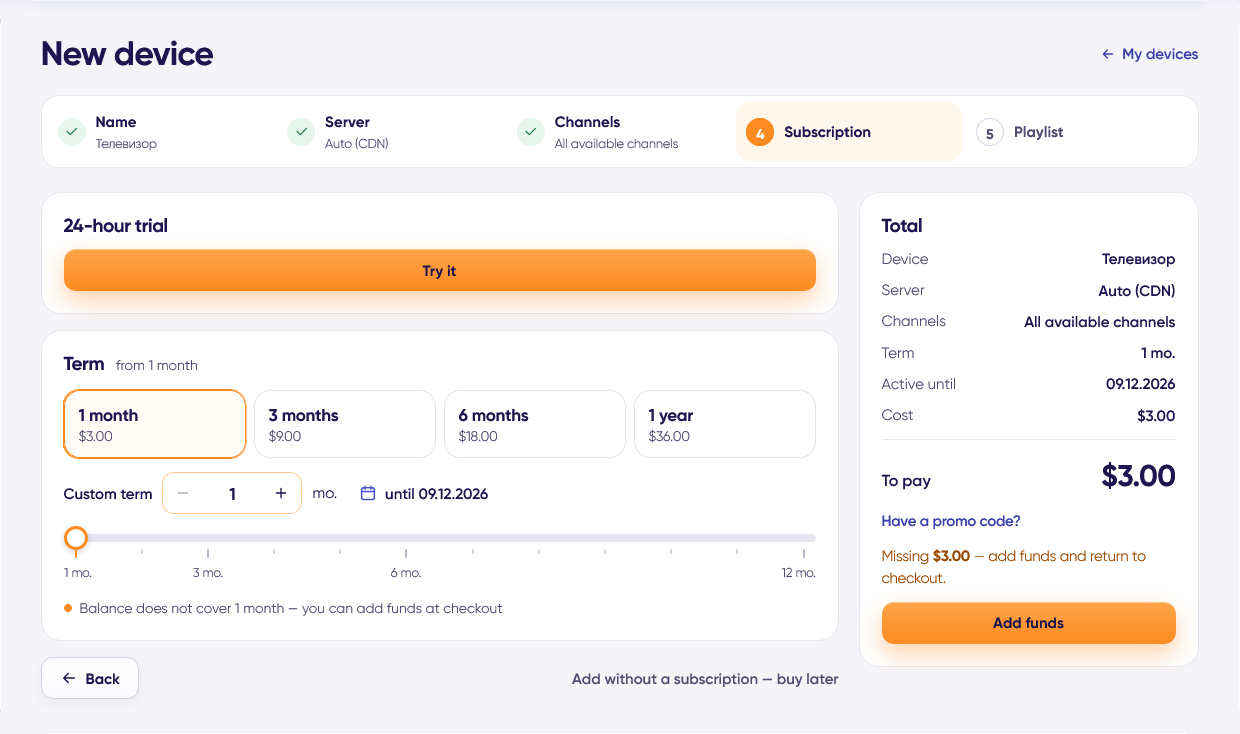
4. Subscription - click the "Try it" button to activate the 24-hour free trial.

step4.png


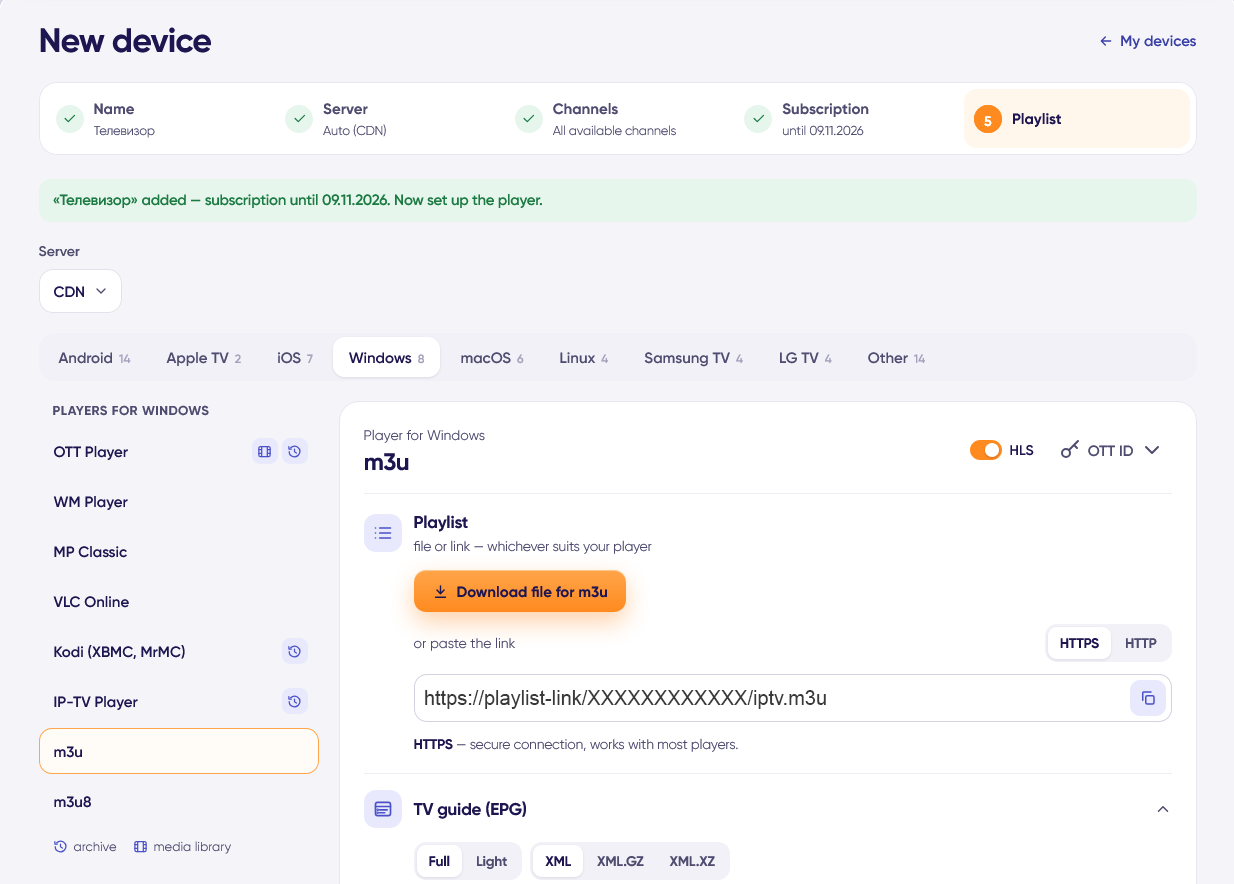
5. Playlist - the final step of the viewing setup.

  • Select your device type.
  • Select your player.
  • Playlist links - copy the playlist link or click "Download File" if you prefer to use the playlist as a file.
  • Media Library - used to configure players that support the media library feature.
  • TV guide (EPG) - links for configuring the EPG (Electronic Program Guide).
step5.png

You can now proceed with setting up your IPTV player.


Which IPTV players do you recommend?

We recommend using the following IPTV players:


Samsung Tizen OS:


LG WebOS:
  • ​Smart IPTV: supports catch-up TV (archive).
  • ​SS IPTV: supports catch-up TV (archive).


Hisense Vidaa:

  • ​SS IPTV: supports catch-up TV (archive).


Android:

  • ​Televizo: supports catch-up TV (archive) and media library.
  • ​OTT Navigator: supports catch-up TV (archive) and media library.
  • ​TiviMate: supports catch-up TV (archive) and media library.


iOS / Apple TV:


Please note that we cannot guarantee the proper operation of the playlist, catch-up TV (archive), and EPG in all IPTV players. Compatibility depends on the specific implementation and capabilities of each application.

We are also unable to influence errors, limitations, or changes in the behavior of third-party IPTV players, as we are neither their developers nor involved in their maintenance or support.

You may use any IPTV player that supports M3U playlists. However, in some cases, you may need to manually configure the Electronic Program Guide (EPG) and catch-up TV (archive) features, provided that the selected player supports them.

Which playlist type should I choose for my player?

Different types of playlist URLs are provided for different devices and apps. Using a playlist that matches your device and player generally allows options such as the EPG and catch-up to be configured automatically.

To get the correct playlist:

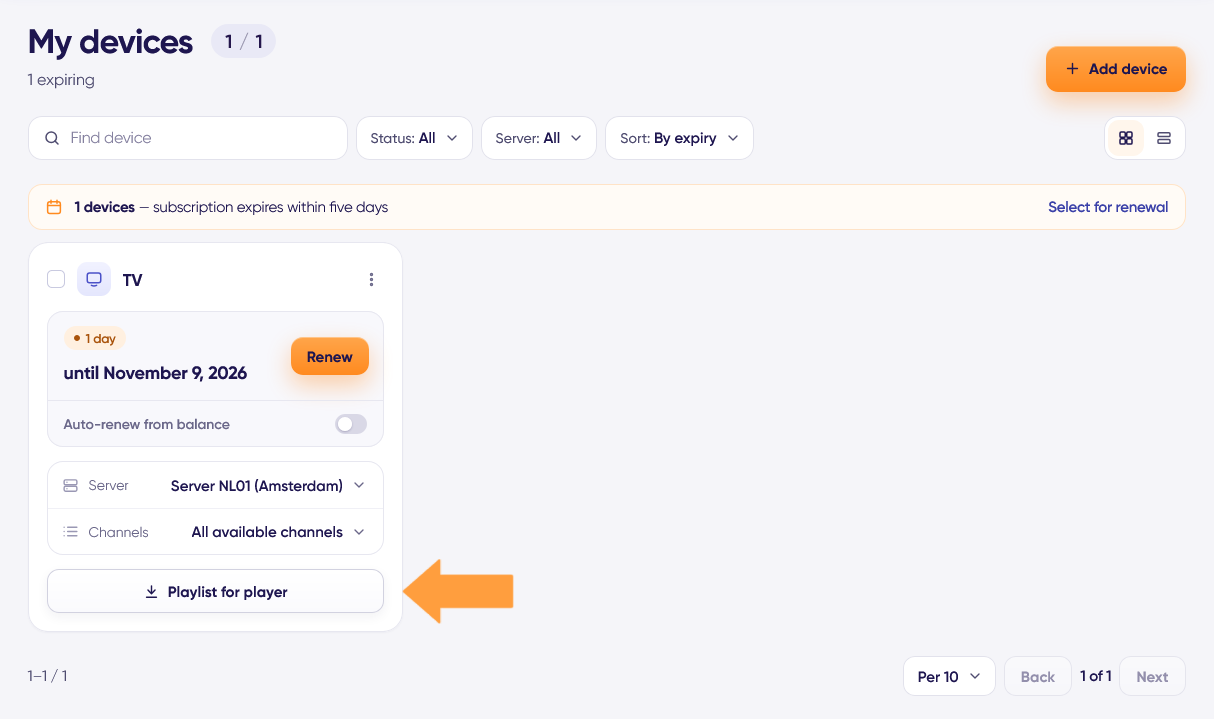
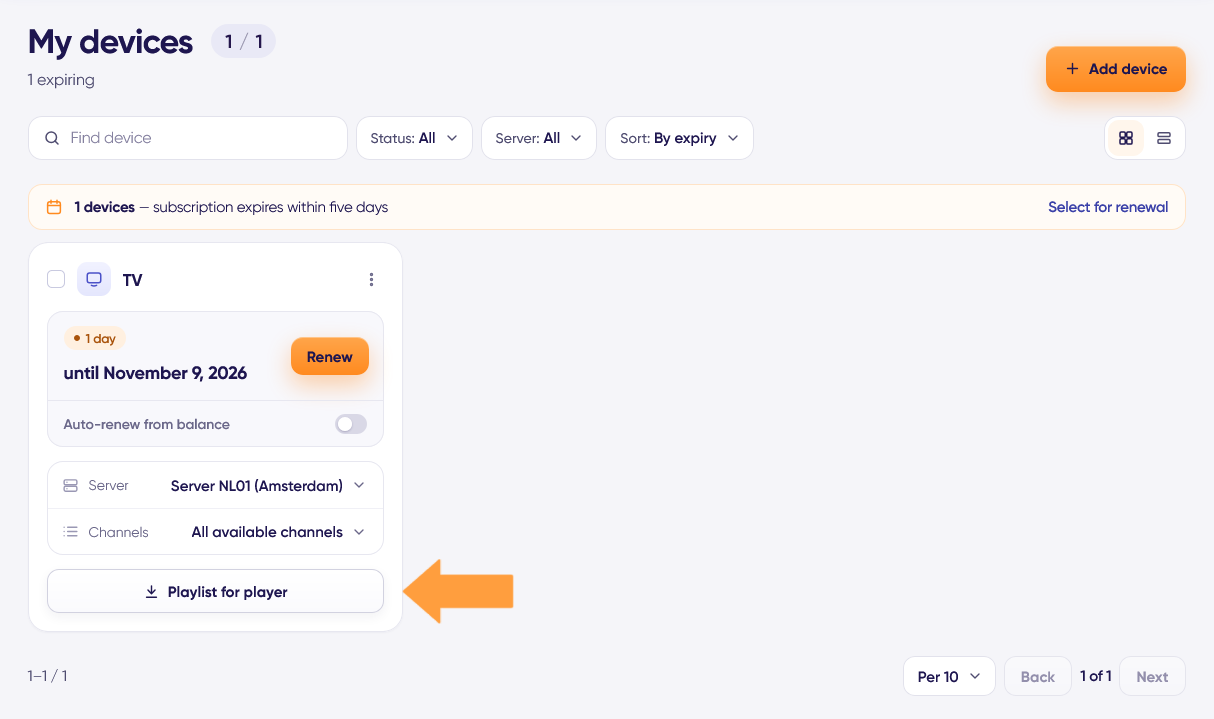
1. Go to the My Devices section and click the button to get the playlist.

get_plst.png


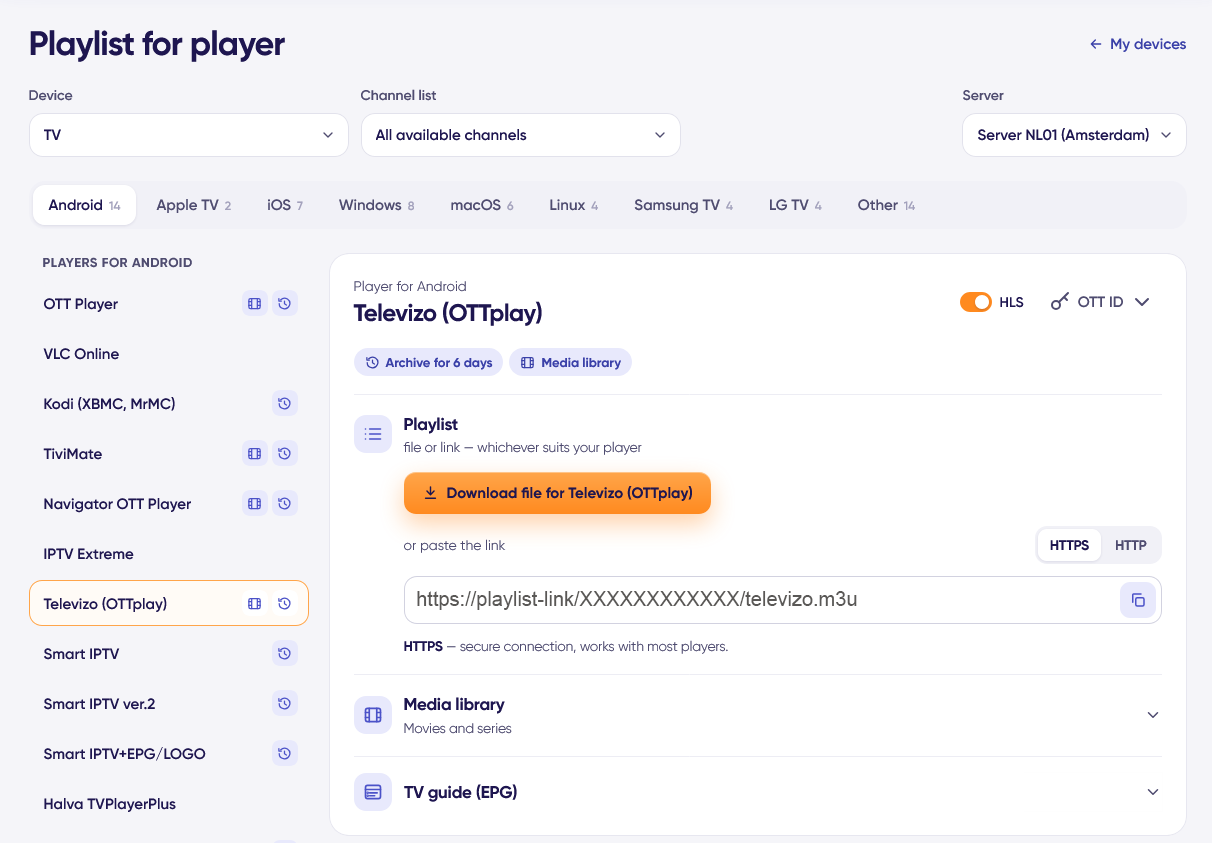
2. Select your device type (Android, iOS, Samsung, LG, etc.).

3. Select your player.

4. Under "Playlist Links", copy the playlist link and use it to configure your player.

get_plst2.png


Note: If your player is not listed, try using the standard M3U/M3U8 playlist links or the Kodi link.
Please note that in this case you will most likely need to manually specify the EPG (Electronic Program Guide) source URL in your player's settings.


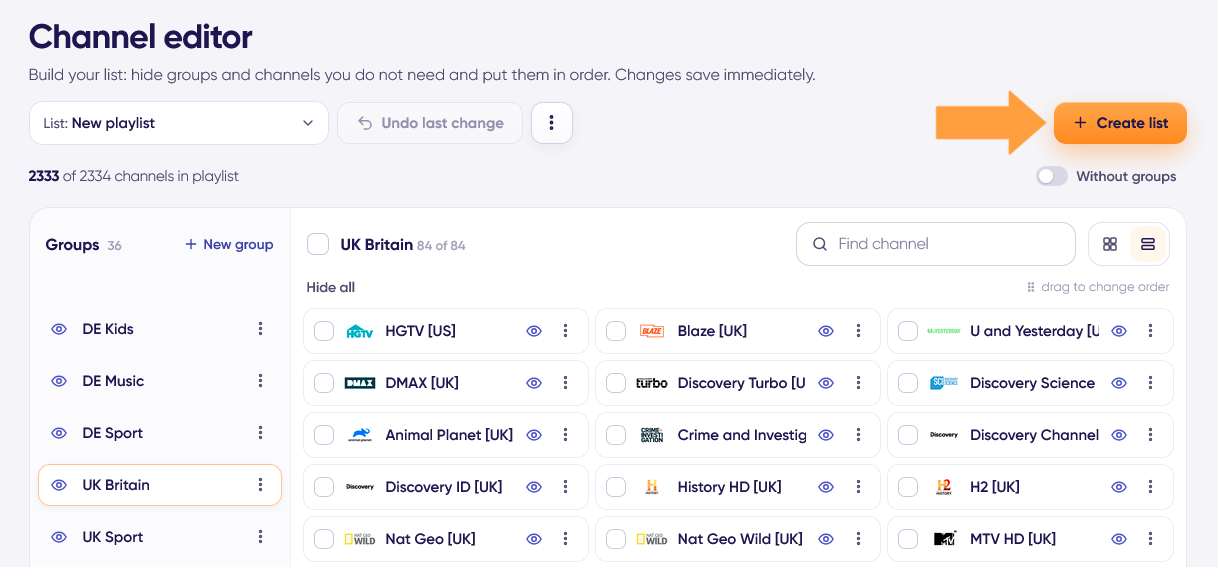
How do I change the channel list in my playlist?

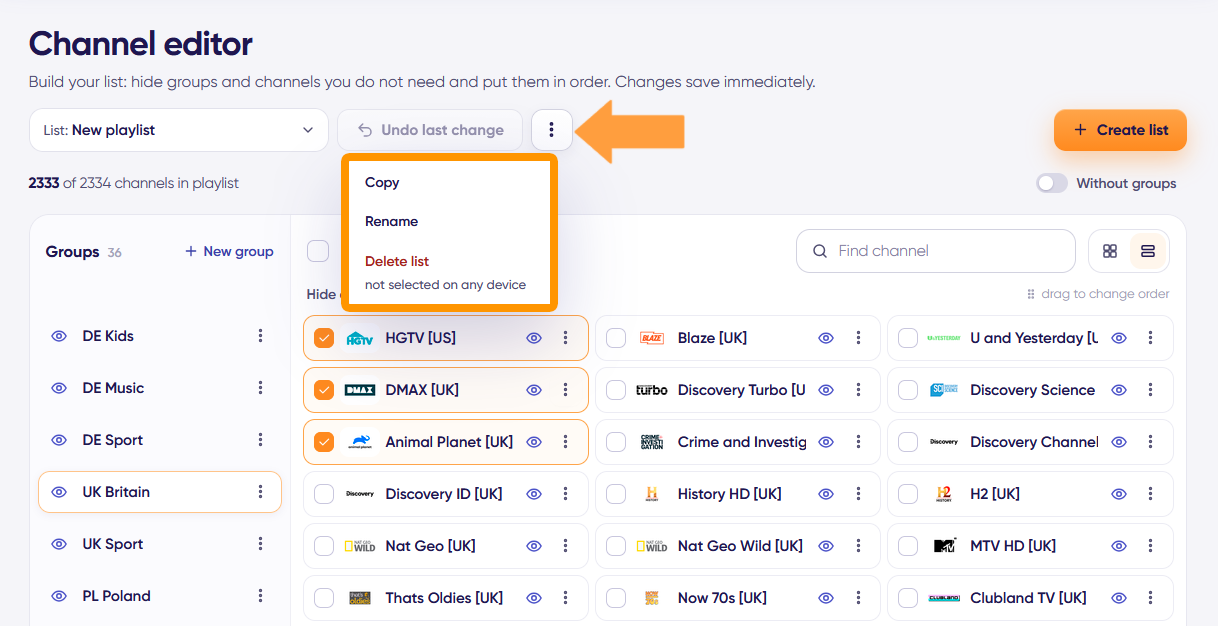
The Channel Editor allows you to create your own channel lists: disable individual channels or entire groups, change their order, and create custom groups with your favorite channels.


Attention: You need to create your own channel list to make the desired changes. Once you have finished editing, you need to update the playlist in your player’s settings to see the changes.

1. Create your own channel list. If you have created multiple playlists, select the one you want to edit.

editor1.png

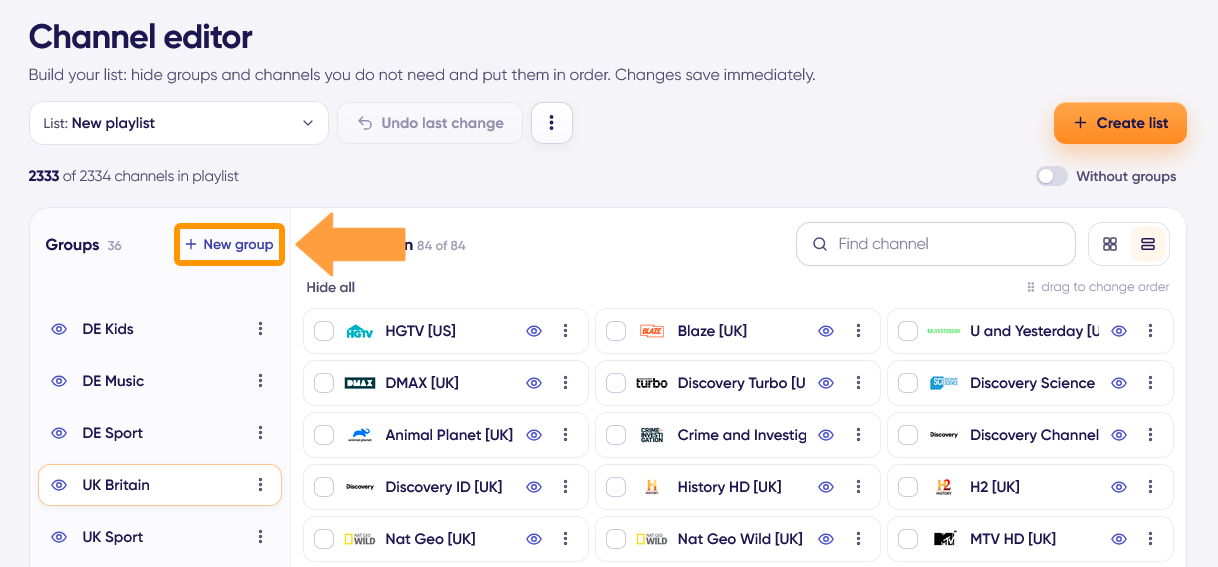
2. Custom Groups - click "+ New group", enter any name, then move your favorite channels from other groups into the newly created group.

A custom channel group is useful if you use several different players on different devices and want quick access to your favorite channels. It also makes it easier to set up the player after reinstalling the player or replacing the playlist.

editor2.png

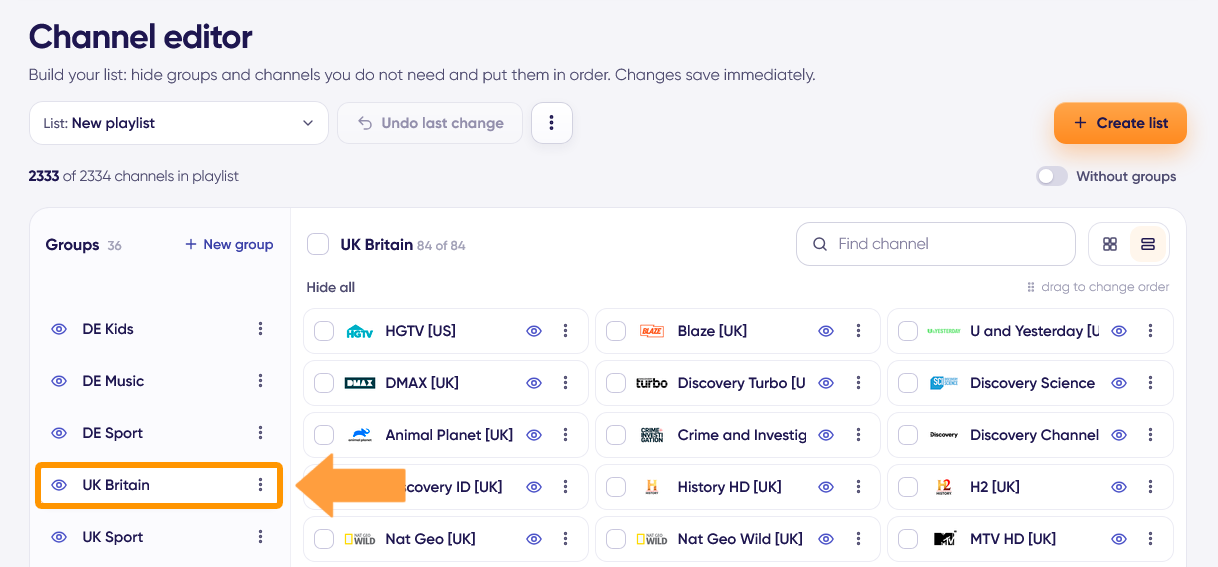
3. Channel Groups — To select a group, click its name.

To hide a group, click the eye icon.

To move a group, simply drag and drop its tile up or down the list, or open the context menu by clicking the three dots on the group tile.

editor3.png


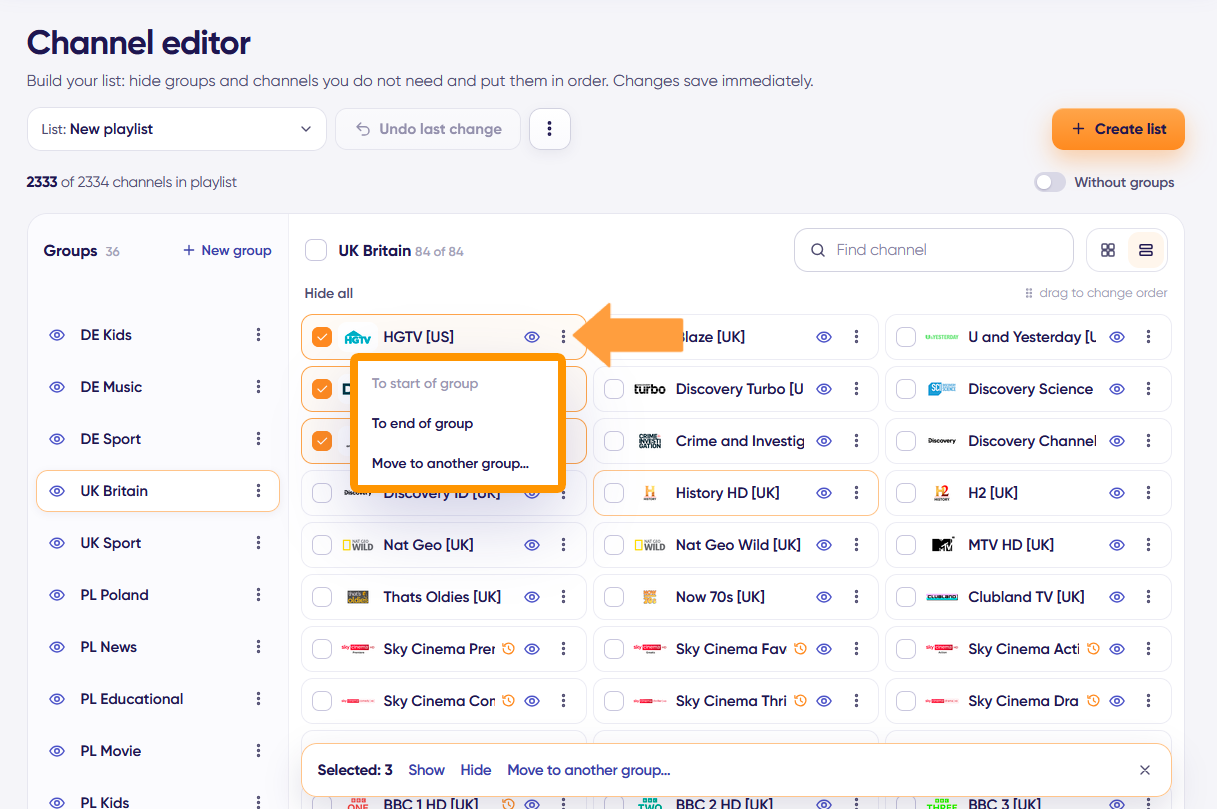
4. Editing Individual Channels - to hide a channel, click the eye icon.

You can reorder channels or move them to other groups by dragging and dropping them, or by using the three-dot menu and selecting the channel checkboxes (useful for moving multiple channels at once).

editor4.png

5. Playlist Management - here you can rename a playlist, reset it to the default settings, delete a custom playlist, and assign a playlist to your devices.

editor5.png

Some channels have no sound or no picture. How can I fix this?

In most cases, the issue is caused by incorrect decoder settings in your player or device.

  • Try selecting a different decoder in your player's settings and then restart the device.
  • Disable any audio enhancement modes (such as Movie, Music, etc.) and restart the device.
  • If you are using a soundbar or home theater system, make sure the appropriate Passthrough mode is configured and enabled correctly. Also, test the playlist playback directly on the TV without the soundbar connected.
  • Make sure you are using the latest software version. If not, update both your IPTV player and your device's operating system.

My internet connection is fast, but IPTV channels are buffering. What should I do?

It is important to understand that internet speed test services measure the speed of your connection to the nearest server of your internet provider.​

When watching IPTV, your device connects to remote servers that may be located in completely different regions. As a result, the connection quality and speed may differ significantly from the results shown by Speedtest and similar services.
What you should do:

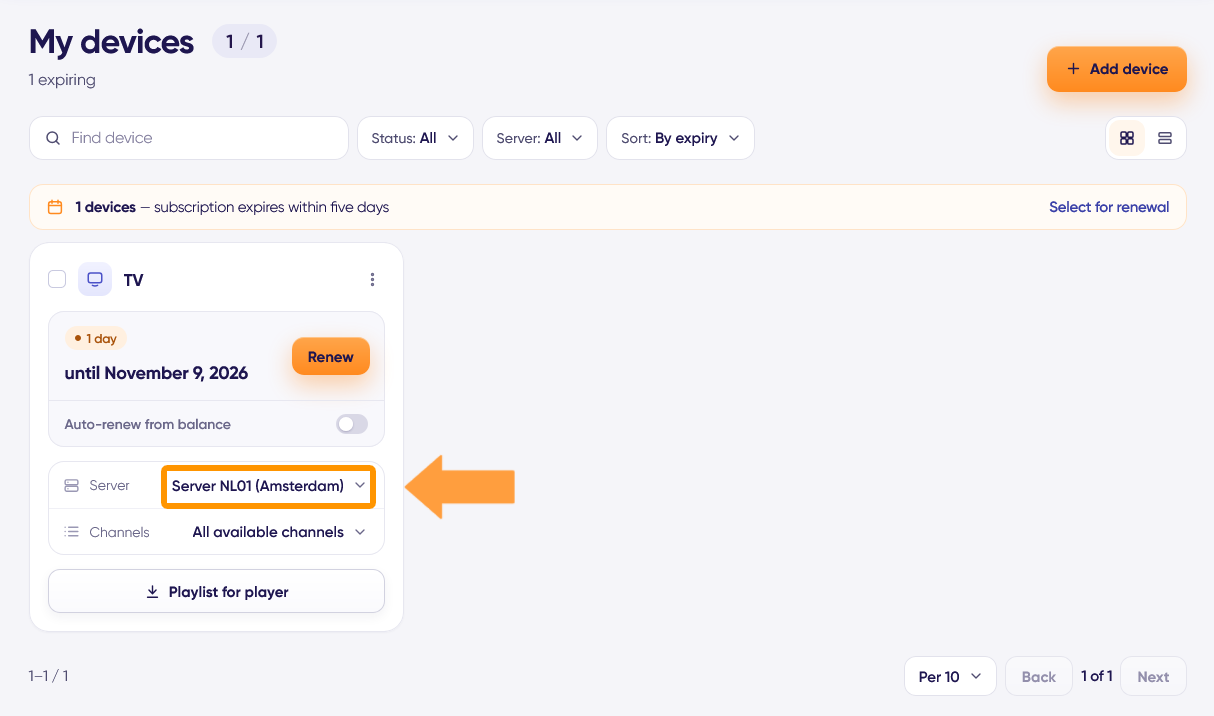
1. In the My Devices section, click the "Server" button for your device then select "Pick by speed test". The server selection page will open.

serv1.png

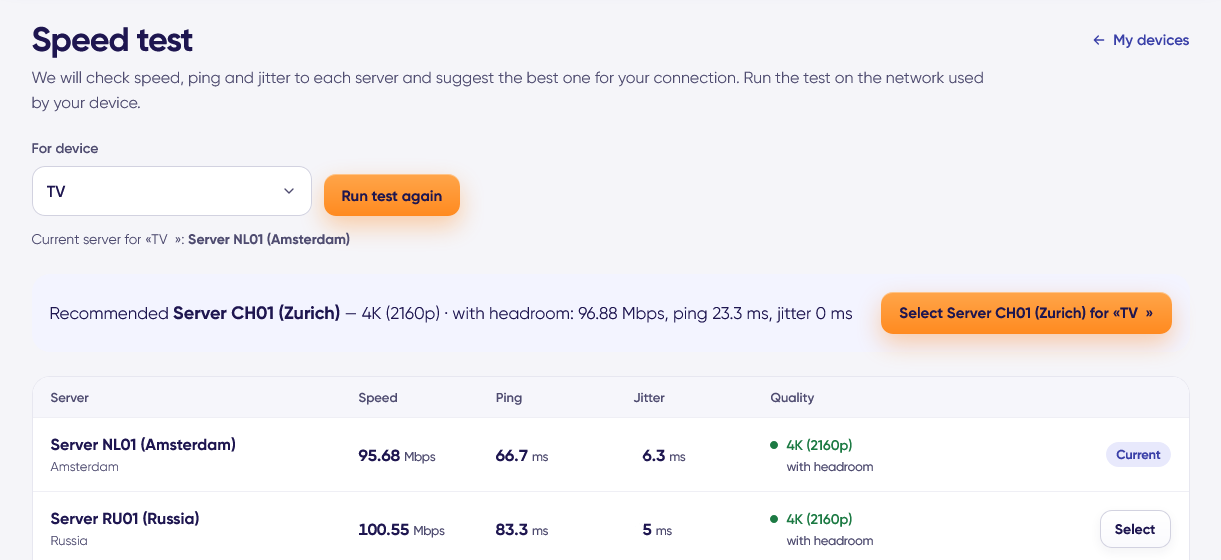
​2. Click the "Start Test" button and wait for the test to finish.

serv2.png

3. Once the test is complete, you'll be prompted to switch to the server that works best with your connection. Save the result, then restart the player after 10 minutes.

Tip
: For the most stable connection, we recommend connecting your device to your router using an Ethernet cable. This can significantly reduce latency, buffering, and connection drops.


What should I do if channels do not start playing?

  • Check your internet connection.
  • Restart your IPTV device and router.
  • Make sure you are using the correct playlist type for your device and player.
  • Try changing the server by running the server selection test, then restart your player after 10 minutes.
  • Make sure your subscription has not expired.
  • In some cases, removing and re-adding the playlist in your player may help.

If the issue persists, please contact technical support through your account. We will do our best to help.


How many devices can be connected under a single subscription?

A single subscription allows up to two devices to be connected simultaneously.

If a third device attempts to connect, streaming will be automatically blocked on all devices.
The block is removed automatically. Please make sure that your playlist link is being used on no more than two devices at the same time, then restart your IPTV player 15 minutes after the block was triggered.


Can I watch the playlist on more than two devices simultaneously?

Yes. To do so, add the required number of devices in the My Devices section and purchase a subscription for each of them.

Please note that each subscription has its own playlist link, allowing you to select different servers and channel lists independently for each subscription.
This is especially convenient if your family members or friends use the service from different cities or countries.


Can I watch the playlist from a different location, city, or country?

Yes, our service works worldwide. The main requirement is a stable internet connection to our servers.

If you travel frequently, we recommend running the server selection test each time you change your location or internet provider. This will help ensure the best possible streaming experience.


Streaming has been blocked due to exceeding the simultaneous connection limit. What should I do?

Make sure that your playlist link is not being used on more than two devices at the same time.​

Restart your IPTV player 15 minutes after the block occurred.

In some cases, exceeding the connection limit may be caused by:

  • An internal IPTV player error that generates duplicate requests.
  • Launching multiple players one after another without properly closing the previous one.
  • Brief internet interruptions or packet loss without a full connection drop.
  • Short power outages.


Recommendations for resolving the issue:

  • When switching to another player, make sure to fully close the previous one, including any background processes. For example, on Android devices, terminate the previous player's background processes before opening another player.
  • Restart your IPTV device and router by disconnecting them from power for a few minutes.
  • If restarting the equipment does not solve the issue, try reinstalling the IPTV player and configuring it again.


If streaming blocks occur regularly, it is possible that your playlist link has been shared with a third party. To resolve this, update your OTT ID:

1. In the My Devices section, click the button to get the playlist.

get_plst.png

​2. Click the "OTT ID" button and generate a new OTT ID.​

OTT-ID.png

3. After updating it, replace the playlist link in your player's settings with the new one.

Need a hand?

Describe what is not working — we will reply and help you sort it out.

Telegram